Inserting Javscript
Prerequisites
(1) A good understanding of Javascript and jQuery.
(2) Knowledge of the javascript application to be inserted.
Objectives
- By way of a sample, insert the Maquarie Bank Payment Credit Card Encryption interface.
Pseudo Code Provided by the Bank
html
head
script src="https://static.deft.com.au/cse/v1/crypto.min.js" /script
!-- PROD --
script src="https://static.deft.com.au/cse/v1/apcpublickey.js" /script
!-- SANDBOX --
script src="https://static.deft.com.au/js/sandbox-cse-pubkey.js" /script
script
var cardNumber='41111111111111';
var cardCVV='123';
var encryptor = new Crypto();
encryptor.setPublicKey(apcPubKey);
var encryptedCardNumber = encryptor.encrypt(cardnumber);
var encryptedCardCVV = encryptor.encrypt(cardCVV);
//send the ecryptedCardNumber and encryptedCardCVV in the /v3/payment request payload.
/script
/head
/html
Analysis
There are two externally sourced scripts to be included in your form(s).
For a test / development / sandbox system:
script src="https://static.deft.com.au/cse/v1/crypto.min.js" /script
script src="https://static.deft.com.au/js/sandbox-cse-pubkey.js" /script
For a production system:
script src="https://static.deft.com.au/cse/v1/crypto.min.js" /script
script src="https://static.deft.com.au/cse/v1/apcpublickey.js" /script
For run time in both:
There is another script that will need to be modified for your application to pass the entered credit card number and CVV to the encryption routines.
This script will also need the application access key "apcPubKey" as provided by the bank. This variable could also be set from a database field but we will simply hard-code it into the script.
script
var cardNumber='41111111111111';
var cardCVV='123';
var encryptor = new Crypto();
encryptor.setPublicKey(apcPubKey);
var encryptedCardNumber = encryptor.encrypt(cardnumber);
var encryptedCardCVV = encryptor.encrypt(cardCVV);
//send the ecryptedCardNumber and encryptedCardCVV in the /v3/payment request payload.
/script
Event to Trigger the Encryption:
The run time script will need to be invoked.
The user will enter their card details and click on a button to submit the data for processing.
We want the encryption to occur in the browser so that the Card Number and CVV are not passed back to the web server as clear text.
Plan the Tagging of DesignBais Fields for Access by Javascript
Element IDs in DesignBais change as fields are inserted or deleted from a form.
To avoid the need to update your scripts when the form changes, DesignBais has introduced "Custom Attributes". This let's a developer identify specific fields for use in any script function.
From the above analysis we need the Credit Card Number, CVV and submit button identified.
For this sample let's use:
- An Input field with attribute macq="card" [this is the card number field]
- An Input field with attribute macq="cvv" [this is the cvv field]
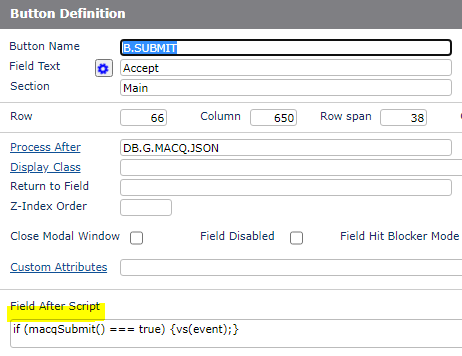
- A button with a "Field After Script" to do the encryption before calling the database to process the transaction.
The Run Time Script
//MACQUARIE PAYMENT ENCRYPTION
function macqSubmit() {
// Set your access key
const apcPubKey= '-----BEGIN PUBLIC KEY-----...one long string...-----END PUBLIC KEY-----';
//first validate
try {
$("input[macq]").each(function () {
var encryptor = new Crypto();
encryptor.setPublicKey(apcPubKey);
var dum = encryptor.encrypt($(this).val());
if (dum === false) {
throw new Error("Encryption failed");
}
});
} catch (excp) {
alert(excp);
return false; //an error occured during validation - exit
}
//validated OK.
$("input[macq]").each(function () {
var encryptor = new Crypto();
encryptor.setPublicKey(apcPubKey);
$(this).val(encryptor.encrypt($(this).val()));
});
$("input[macq]").css("color", "white");
return true;
};
The script walk through:
-
function macqSubmit()
This function will do the encryption. It will be invoked from a standard DesignBais button with a "Field After Script".
-
The section of code below the comment //first validate
This encrypts each input with an attribute macq i.e. both the Card Number & CVV. The script will exit if there is an exception detected. Returning false at this point will by pass the database event.
-
The section of code below the comment //validated OK
Once we know the encryption has passed then the entered values in each field are replaced with their encryptions.
-
$("input[macq]").css("color", "white");
Makes the text color match the background so that the encrypted strings are not visible to the user.
-
return true;
This allows the standard DesignBais event interface and will pass the encrypted values back for further processing.
Add the Scripts to your Site
This can be done in a number of ways.
On the Web Server
In the root directory of the DesignBais web site there is a custom.js file which may be updated with the required scripts. There is also a separate js folder which may hold your script file for inclusion in your forms.
If you use this method then all database accounts will have access to the scripts.
In a multi-client system this may not be suitable as the Public Key may attract charges and access to the key may need to be restricted.
The custom.js file would need to be backed up in case it accidentally gets over written during a DesignBais Web Component upgrade as we release an empty file.
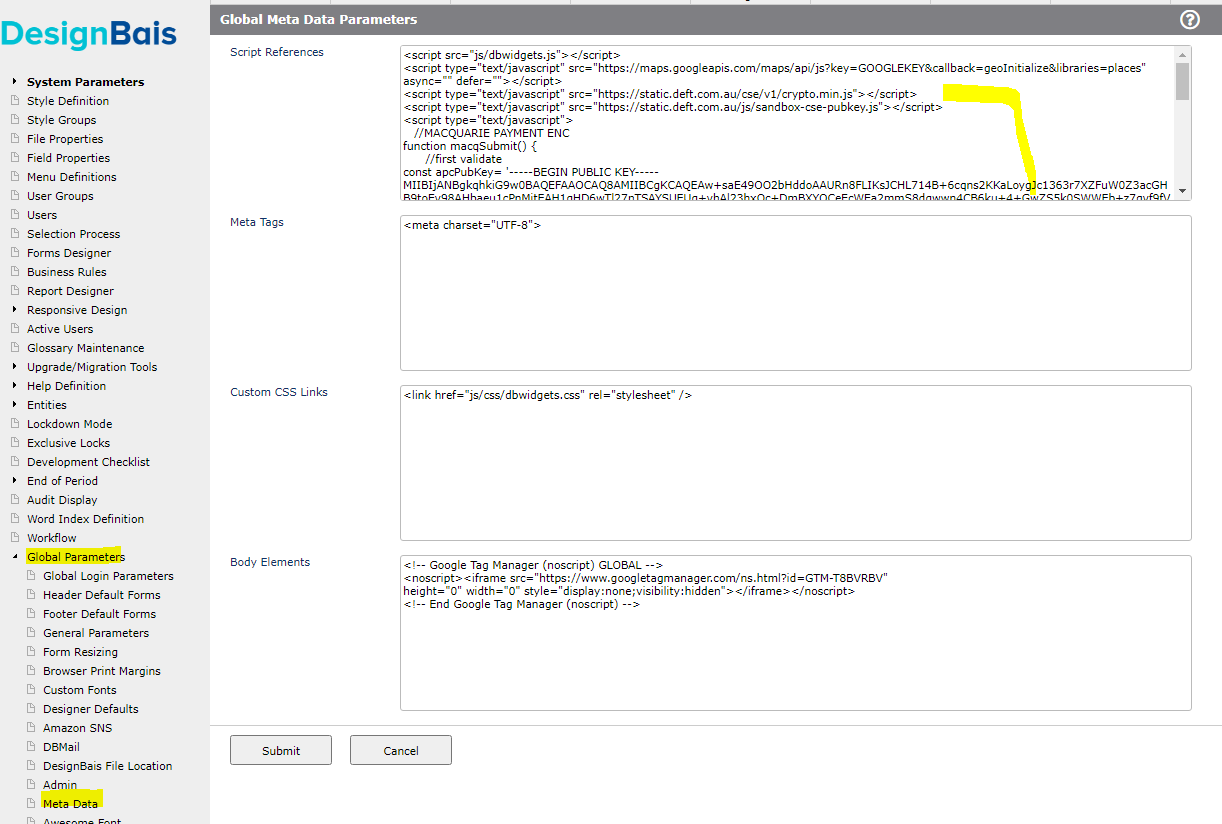
Global Parameters - Meta Data
Use this menu option to insert scripts from the Data Component for all accounts that are accessible from the web site.
After submitting the changes you will need to refresh your session in order to load the scripts ready for use.
In the screenshot below you can see the two external scripts have been entered and the start of the run time script.
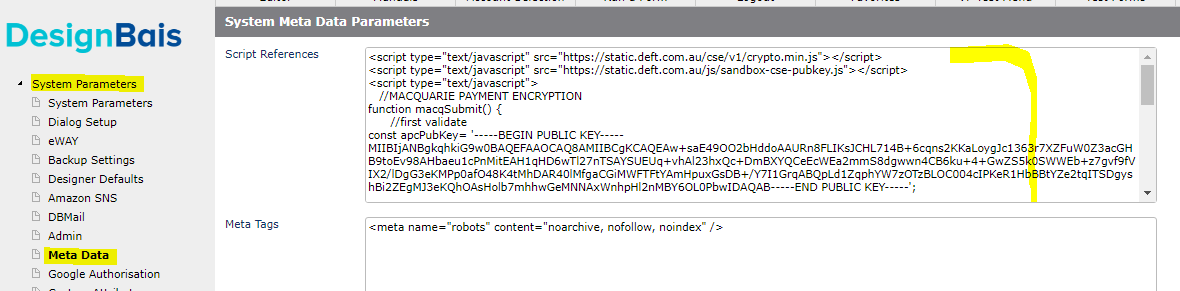
System Parameters - Meta Data
Use this menu option to insert scripts from the Data Component for one account that is accessible from the web site.
Again, after submitting the changes you will need to refresh your session in order to load the scripts ready for use. The scripts will be loaded as you connect into the target account.
In the screenshot below you can see the two external scripts have been entered and the start of the run time script.
Set the Custom Attributes
Add your fields to your form and set the Custom Attributes:
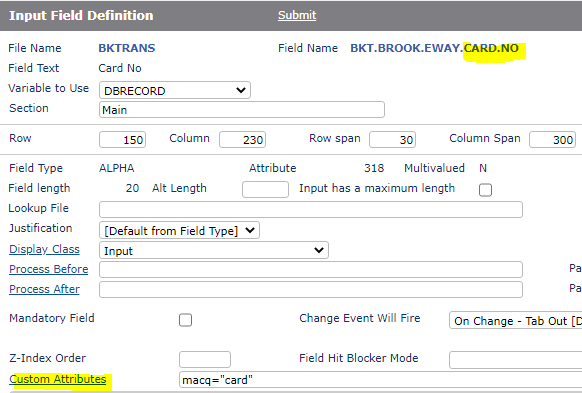
Do the same for the CVV field.
Set the Field After Script on the Button